Building an AI Chatbot Playground with React and Vite
.png)
Read how we set up an experimental chatbot environment that allows us to switch LLMs dynamically and enhances the predictability of AI-assisted features' behavior within the ilert platform. The article includes a guide on how you can build something similar if you plan to add AI features with a chatbot interface to your product.
Why use an AI chatbot playground?
At ilert, we are integrating various AI features that utilize a chat interface, including on-call scheduling and AI-powered assistance for our technical customer support team. To streamline development and maximize efficiency, we have created an AI chatbot playground that allows us to switch between different large language models. This AI playground serves as a tool for instructing models to respond within specific parameters, enabling us to predict model behaviors, debug issues, and test new features and enhancements.
We recently showcased this playground at our meetup, allowing attendees to experience how we approach AI feature development. The AI chatbot playground served as an effective demonstration tool, enabling attendees to test it themselves and learn how to apply similar techniques in their own work. It has become essential to our AI feature development process, allowing us to iterate quickly and optimize our models based on real-world feedback and a variety of testing scenarios.
Tips on how to build your own AI chatbot playground
AI Playground Setup
To set up our AI playground, we’ll use Vite. It offers a quick step-by-step setup of a repository via CLI.
bun create vite
Following the prompts, you may now choose your project name, framework, and variant (language + transpiler).
Building the UI
The following is one possible approach to building your chatbot’s UI. Feel free to get creative and put your own spin on it.
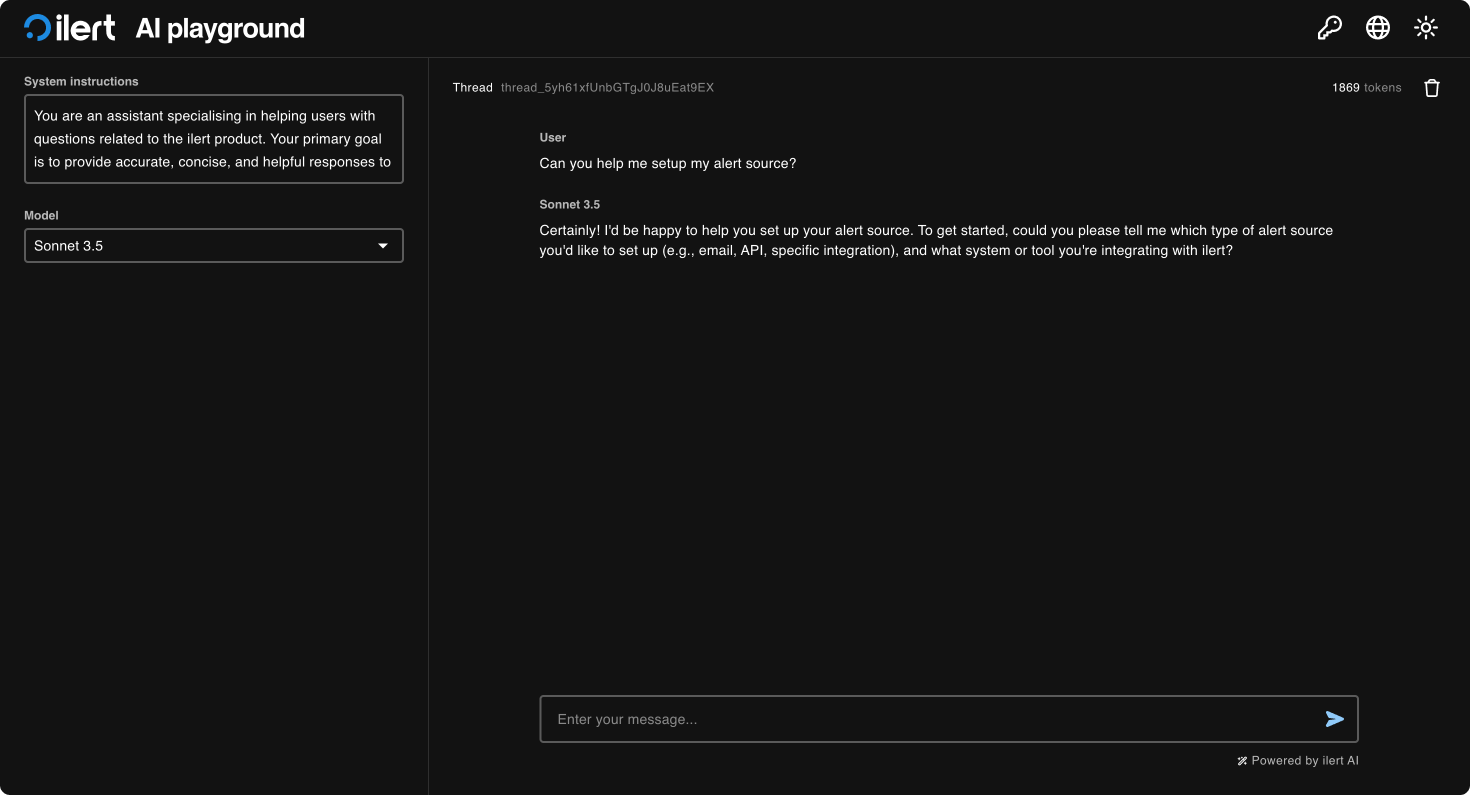
Building an AI playground should roughly have the following structure with components:
- Headerbar
- Logo
- Heading
- Action buttons
- Sidebar
- Instructions
- Model
- Chat
- Messages
- Input box
Components
Earlier in our setup, we chose React as our framework with Typescript, while MUI serves as our component library.
Headerbar
The headerbar contains a logo, heading, and action buttons.
<Toolbar>
    <Stack direction="row" justifyContent="flex-start" alignItems="center" spacing={2.5}>
        <IlertLogo />
        <Typography variant="h5">
            {translations.playground}
        </Typography>
    </Stack>
    <Stack direction="row" justifyContent="flex-start" alignItems="center" spacing={1}>
        <TokenInput />
        <LanguageToggle />
        <ThemeToggle />
    </Stack>
</Toolbar>
Sidebar
Our sidebar wraps components and provides the user with the ability to choose and tune a model. Instructions should be a text input field, while the Model should be a dropdown with select functionality.
<Stack direction="column" justifyContent="flex-start" alignItems="flex-start" spacing={3}>
    <TextField
        label={translations.system_instructions}
        multiline
        rows={3}
        placeholder={translations.instructions_placeholder}
        value={instruction}
        onTextChange={handleTextChange}
    />
    <Select
        value={model}
        label={translations.model}
        options={modelOptions}
        onSelectItem={handleSelectModel}
    />
</Stack>
Chat
This is where the user engages in a conversation with the AI assistant. We need an input field and message components to render the conversation.
<Container>
    <Stack>
        {chat.map((message, index) => (
            <Message key={index} message={message}  />
        ))}
    </Stack>
    <InputWrapper>
        <UserInput />
    </InputWrapper>
</Container>
Here’s a snapshot of our finished product, highlighting the components mentioned above:
.png)

Going forward
Building your own AI playground might take some time, but the reward is great, given its endless use cases. You can choose your own data sources, whether they are cloud providers like OpenAI or self-hosted open-source models.
To further expand on this idea, you could create an export function or bundle the app into different platforms using tools like Electron for desktop applications. Other sensible features would be a theme mode toggle, authorization input (for ex., API keys when using third-party providers), or providing a language switch.


.png)


.png)


